

Project for $1 dollar, from Radio Craft Magazine, March 1935
Build me the simplest possible radio receiver," was the order that came down the line from the Big Chief, who continues, "Just imagine yourself on a desert island with only a standard radio tube and little else for constructing the set." We here present to the beginner in radio a set built under these "Robinson Crusoe" conditions. It picked up programs from Dallas, Texas, 1,500 miles away, on the very first night!
We have always with us a very large class of those who get a tremendous amount of satisfaction from accomplishing something that the other fellow can't do so well. Also we have a large class of those who take nothing for granted but wish to be their own bosses when it comes to certain accomplishments. Nowadays, things are made pretty easy for those who wish to build a simple radio set, but suppose you went on a desert island or in a very small community where you could not buy the parts that go into a radio set; or suppose you were a young man or a shut-in with very little money with which to buy certain parts. What kind of radio set could you build?
Then, also, not so many months ago, a children's encyclopedia made a request to the editor of this publication for a very simple radio set that any boy could build, fron things easily obtainable. Strange to say, he could not produce such a set for them on short notice simply because none had ever been built.
All this brings us to the question, what is the simplest radio set that can he built and also the cheapest?
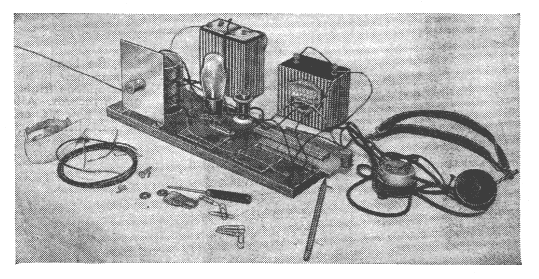
The editors have given this considerable thought and experiments have produced the present beginners' set which should fill the bill handsomely. It is, in fact, so simple, that with the exception of the radio tube, everything is made from junk and parts that can be found in any house. Yet, with all, the set actually brings in distant stations from all over the country. There has been no idea to perfect anything on this particular set. It isn't intended to compete with the set that uses standard parts, to be sure. It is just a stunt to show what can be done with practically nothing and should be welcomed by those youngsters from 8 to 80 who wish to accomplish the impossible with very little. To those the present set has been dedicated.
Prime Requisites of a Good Set
Any radio set worth its salt should have the following characteristics:
(1) Absolute minimum cost of parts.
(2) Sufficient
selectivity to separate powerful local stations, yet
sensitivity enough to give the beginner plenty of distance
(DX) thrills.
(3) Easy to construct and operate.
(4)
Minimum operation expense.
Making use of odds and ends (some of them new to even dyed-in-the-wool hams); and using a little ingenuity in putting them together, anyone can build this novel little outfit.
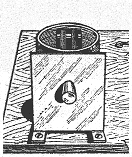
Let's take the set apart and build it up, one step at a time. Easy does it, so we begin on a sawed-off board measuring anywhere from 5 x 14 ins. (the size used for the set on the cover) to 8 x 20 ins. Finish it off as finely as you please, or leave it rough. It pays to take pains, though, and a well-sanded, shellacked base, set aside to dry, gets you off to a good start. Make a layout on a sheet of paper, full size -- indicating just where each part is to go. This helps considerably when you wire the set.

The fixed condensers needn't scare you. They are of the "postage-stamp" variety, and are made from waxed paper and tinfoil. Strip the foil from a pack of cigarettes or a tea package and smooth it out on a flat surface with your thumbnail. Cut six pieces, each l x 2-1/2 ins. overall, with one end cut to form a tab as indicated in Fig. 2A. Cut eight pieces of waxed paper, l-1/2 x 2 ins. For the grid condenser, place a piece of paper on the set base in the front center, then a piece of tinfoil on top of that, with the 1-in. tab projecting from one end. Then another piece of paper, and the second tinfoil "plate" with the 1-in. tap projecting from the opposite side. That's the condenser! Make sure the two peices of foil don't short together. A piece of cigar-box wood a trifle larger than the paper is tacked by the corners (don't get the tacks near the foil) over the pile. Leave that for a while and build up the phone bypass condenser the same way, using two right- and two left-hand "plates" alternating.
Now we tackle the grid-leak, which is simply a high resistance path past the condenser. A piece of cigar-box wood 1-1/2 ins. long by 1/2 in. wide is blackened on top with a soft pencil and then fastened lightly to the base with two brass headed tacks or screws 1 in. apart. Don't tighten or drive down until connections are made--later.
Fig. 2
Showing shape and
dimensions of fixed condenser plates at A, unique tube socket
at B, and tube filament resistor at C.
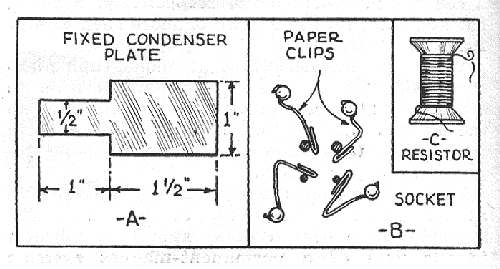
The tube socket consists of 4 holes halfway through the base as indicated (Fig. 2B) the 2 rear ones (filament) being slightly larger than the others (1/8- and 1/16-in. will do). Contact is made to the tube prongs by means of 4 ordinary wire paper clips, bent so that the smaller part makes a spring contact with the prongs. Three of these clips are fastened to the base with washers and screws, but not driven all the way in. The fourth clip, bent as shown, is lightly secured by the washer and screw to be used as the "A --" terminal. And so we have the socket, --and a real good one, too!
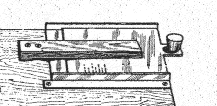
And Here We Have the Tuning Condenser
The variable condenser, if carefully made, will tune easily and well. Cut a piece of tin, copper, brass or aluminum into a 2-1/2 x 4-1/2 ins. rectangle with a 1/2 in. square tab at one end.
Take time to smooth it out flat, with sharp edges filed or
sanded off. Punch a hole in the center of the tab for a screw.
Shellac that portion of the base and one side of the plate.
When the shellac is thick press down firmly in the place
indicated. Slip a washer over a screw, twist the end of a 2
ft. length of wire under the washer and screw tight through
the hole in the tab.
Cut another plate from the same
material 2-3/4 x 4-1/2 ins., (not counting a half-inch square
tab at one end ). Smooth and flatten as before. Punch a hole
in center of tab and screw a cork on, with the end of a piece
of flexible wire (old lamp cord, or any wire not stiff) 12
ins. long under the washer. Soak a piece of cellophane 3x5
ins. in water for a few minutes; then place it on the lower
plate, leaving an even margin around the edges. Press down
tightly, and shellac the edges to the wooden base. Guides are
fastened to the base on either side of the bottom plate,
leaving a 1/8 in. gap. They are simply strips of tin fastened
with thumb tacks, and serve only to keep the movable plate on
the right track. A slat of cigar-box wood, 1/2 x 4 ins. long,
is screwed with two screws in the position shown. This will
hold the top plate in place against the bottom plate.
Tightening or loosening the screws serves to produce just the
right tension on the movable plate.
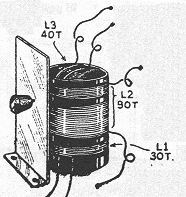
Now we tackle the three-circuit tuning coil, and again it is easy if we take it one step at a time. Get a cardboard tube 2-1/2 ins. in diameter (baking powder. coffee, salt carton) and cut with a razor blade to 4 ins. in height. Begin 1 in. from the bottom and wind on 30 turns of No. 28 insulated wire (cotton, silk or enamel). This is L1, the antenna primary. Bring the ends down through pinholes in the tube.
Put little tickets on each lead indicating which is which, so that when the coil is mounted you will have no difficulty with wrong connections. Next leave a gap of 1/8-in. and wind on 60 more turns. Don't break the wire here, but leave a 3/16-in. gap and continue for 30 more turns. This is L2, the antenna secondary. Bring the ends down inside the tube to the same end as the primary coil and mark for identification.
Punch holes in opposite sides of the tube in the center of the 3/16-in. gap to admit a piece of stiff wire used as a shaft for the "tickler" or feed-back coil. This coil is wound on a 2 in. tube l-1/4 ins. high. (Cut a 1-1/4in. piece out of a section of the 2-1/2 in. tube, overlap 1/4-in. and glue or tie in place, or use a 2 in. tube if available.) Wind 20 turns on each side of the center, leaving 1/8 in. gap for the stiff wire shaft. If flexible "cord" is handy, attach a 1 ft. pieces to each end of coil Otherwise just leave ends long.
Now straighten out a 5-in. piece of stiff copper wire-(copper is best, but a package handle will do) and push it through the hole in the outside coil. Now a washer; punch through both sides of the tickler at the center gap, another washer, and the back side of coil, projecting 1/4-in. Sealing wax on the shaft and inner surface of the tickler will secure both very nicely. Shellac all coils (although not really essential).
Now mount the coil in any way you like, so long as it is upright, with the tickler near top. Bring the 4 leads out at different parts of the bottom of the tube to eliminate any possibility of short circuits. The tickler leads come out at the top.
The shield in front of the coil is a square piece of any metal available, with bent-over feet at the bottom and a hole punched to pass tickler shaft. At this point you can make first complete connection. Bring the top of the antenna coil (L1) to one foot of shield, scrape off the insulation and secure under the foot, bringing the end back to post "G" (ground). The shield should be 1/4-in. from side of the coil. Drive a cork on the wire shaft pushing it far enough to spring the shield tward the coil slightly. This provides the friction necessary to make the tickler stay where you turn it.
One other item and we are ready to wire to set. Wind 36 ft. of No. 36 insulated wire on a thread spool, securing the ends in slits cut in the spool end, and leaving 6 ins. free at each end. This is the filament resistor, to reduce the 3V dry battery to 2 V for the 30 tube filament. A long screw or nail holds the spool upright on the base just to the right of the tube socket (See Fig. 2C).
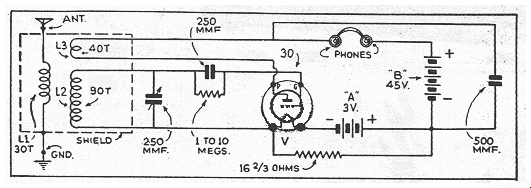
Now for the wiring. If you have left the proper lengths as instructed it will be easy, and no solder need be used if you don't have it. Run the bottom lead of L1 antenna coil to post "A" (aerial). The bottom lead of L2 (grid coil) goes to one tab of the grid condenser and one end of grid leak, along with one end from the variable condenser. Roll the foil around the wires an press them tightly together. The top of L2 goes to post "A+", where the other variable condenser lead joins it. (All "posts" are just plain wood screws with washers.) One lead from th tickler (L3) goes to one phone post and to one tab of the phones bypass condenser. The other end of L3 goes to the tube plate clip. One end of the resistor spool wire connects to "A+." Run a wire frorr the "B--" post to the other end of the bypass condenser and then to "A--" (which holds one socket clip.) The grid clip of the tube socket goes to the grid condenser and grid-leak. The remaining end of the spool wire goes to the remaining clip, "A+," of the socket. The last wire connects post "B+" to the remaining phone post.

Connect two dry cells in series (that is, with the "+" or center post connected with a wire to the "--" or side post of the second cell) to the posts marked "A+" and "A--" (the center connection of a dry cell is positive). Connect the phone and 45 V. "B" battery to their respective screw posts and plug in the tube. Now all you have to do is turn the tickler slowly and move the condenser at the same time. There is a slight click when tickler coil goes into "oscillation." This is the most sensitive setting. A little practice will enable you to tune easily. Use a pencil eraser to erase part of the gridleak, a little at a time, until the tickler works smoothly and programs are loudest. And there you are! Good luck!
Copyright © 2015 - All Rights Reserved - www.vcomp.co.uk